Oven fried chicken

I love quality fried chicken. Not the sweaty 99p for six spicy wings of questionable provenance but karaage chicken – chicken marinated in loveliness & twice-fried so it’s deliciously crispy – that my pals at Foul Mouths supper club in Forest Hill, South London specialise in.
The problem with friend chicken though is it’s fried and that in any quantity is going to leave you with a family bucket sized tummy.
That in mind I decided to have a go making my own crispy coated chick chick in an oven.
I used a buttermilk soak to make the chicken extra moist and help the coating stick.
You can also leave the skin on but as we are being healthy I took mine off.
It turned out well I think so please give it a try and if you’ve got any tips on improving it please leave a note.

Ingredients (for two people)

Two chicken leg portions, separated into drumstick and thigh – you’ll have four pieces.
Buttermilk, about 250ml
100grams Plain flour
One tsp Chilli powder
One tsp Paprika
Half a tsp Salt
One tsp Ground black pepper
Knob of butter and splash of veg oil.

Method

1) Remove the chicken skin and put in a bowl with buttermilk for an hour or better overnight.
2) Preheat oven to 180c and add butter and oil to shallow baking tray
3) Combine the dry ingredients in a large bowl
4) Remove the chicken one piece at a time from the buttermilk, shaking of excess, then dunk in seasoned flour and add to baking tray.
5) Cook for 20 minutes, turn, cook for 20 minutes more. Careful not to move chicken too much as the coating is fragile.
5) Serve with a iceberg lettuce wedge and blue cheese dressing and bacon crumbs.

Yummers.

20140608-222604-80764132.jpg

Advertisement

Butternut squash soup

It might just be damp outside but I can feel a proper cold snap coming and when a friend wrote on Twitter she’d seen frost I knew it was time rescue some vegetables from the allotment.
The problem with frost is it’s frozen water from the air but it will also mean frozen liquid in all my surface lying beetroots and squashes. They go mushy as the molecular structure changes as it freezes and defrosts and while this is great when you want to tenderise something like squid it’s less great when you want to preserve structure or flavour.
Butternut squash properly stored lasts for months so I cut mine, making sure to leave plenty stalk – this is where moisture can get in and you don’t want that.

20131111-203253.jpg

So with a few hardening off in my spare room (radiator turned off) I thought I’d whip up a favourite winter soup recipe with a butternut.
This comes from Dom Chapman the head chef at the fantastic Royal Oak pub in Berkshire and alumni of Heston Blumenthal’s kitchens.
I used a fresh red chilli added at the beginning instead of the cayenne and very little milk as I like my soup thick and this came out thinner than I expected. I also roasted the skins of the butternut tossed in olive oil and on a baking tray for 30min at 150C then scattered on top

Ingredients (makes four generous servings)

Butternut squash soup
1kg of butternut squash
1 large onion
200g of butter
1l of water
700ml of milk
salt
1 pinch of cayenne pepper

Method

1. Peel the butternut squash. Cut it in half lengthways and scrape the seeds out. Then slice the squash with a mandolin as thinly as possible

2. Halve the onion, peel and slice as thinly as possible

3. Take a pot large enough to hold all the ingredients and melt 150g of the butter over a low heat, being careful not to burn it. Add the onion and butternut squash and sweat off over a low heat for 10 minutes

4. Turn the heat up and add the water, then simmer for 30 minutes or until the vegetables are completely soft

5. Remove from the heat and liquidize the soup. Pass through a fine seive. Now add the milk to obtain the right consistancy. The soup should be silky-smooth. Be careful you do not add to much milk, so diluting the flavour

6. Finish the butternut squash soup by whisking in the rest of the butter and check the seasoning. Stir in a dash of cayenne pepper just before serving

20131111-204211.jpg

20131111-204226.jpg

20131111-204239.jpg

Christmas cake

I have very strong memories of making cakes with my late mother.
Standing on a chair at the table stirring various egg, sugar and flour combinations with the promise of being able to run my finger around the mixing bowl.
The taste of uncooked cake mixture transports me back to my childhood.
One of the best cakes my mum made was the annual Christmas cake – heavy with fruit and brandy and seemingly never-ending.
Our family one was cooked and “fed” with brandy for months and then wrapped in marzipan before being covered in Royal icing and decorated with ancient Santa Claus and plastic holly.
This year I have decided to make some cakes as presents and pass them on and hopefully start a tradition which my mum would approve of.
As she did before me I’ve turned to Delia Smith as for Christmas her recipes generally cannot be beaten when it comes to staple dishes.
We are not trying to reinvent the wheel, just make a cake.
A quick warning this recipe takes 12hours to soak the fruit and four hours to bake and this cake is supposed to get better with age – some people make theirs a year in advance – so don’t leave it to the last minute.

20131104-191246.jpg

20131104-191215.jpg

Ingredients

For the pre-soaking:
450g currants
175g sultanas
175g raisins
50g chopped glacé cherries
50g mixed chopped candied peel
100ml brandy

For the cake:
225g plain flour
½ teaspoon salt
¼ level teaspoon nutmeg, freshly grated
½ level teaspoon ground mixed spice
225g dark brown soft sugar
4 large eggs
One dessertspoon black treacle
225g spreadable butter
50g chopped almonds (skin on)
zest of 1 lemon and 1 orange

For feeding and topping:
Brandy to ‘feed’ the cake
100g whole blanched almonds (only if you don’t, like me, plan to ice the cake)

Method – this recipe is from Delia’s Cakes

You should get the pre-soaking ingredients ready the night before you make the cake. Put all the fruits in a bowl and mix them with the brandy, cover with a cloth and leave them to soak for a minimum of 12 hours.

When you’re ready to cook the cake, pre-heat the oven to 140°C.

Now all you do is sift the flour, salt and spices into a very large roomy mixing bowl then add the sugar, eggs, treacle (warm it a little first to make it easier) and butter and beat with an electric hand whisk until everything is smooth and fluffy.

Now gradually fold in the pre-soaked fruit mixture, chopped nuts and finally the grated lemon and orange zests.

Next, using a large kitchen spoon, transfer the cake mixture into the prepared tin, spread it out evenly with the back of the spoon and, if you don’t intend to decorate the cake with marzipan and icing, lightly drop the blanched almonds in circles over the surface.

Finally take a double square of baking parchment with a 50p-sized hole in the centre (for extra protection during the cooking) and place this not on top of the mixture itself but on the rim of the brown paper.

Bake the cake on the lowest shelf of the oven for 4 hours until it feels springy in the centre when lightly touched.

Sometimes it can take 30–45 minutes longer than this, but in any case don’t look at it for 4 hours.

Cool the cake for 30 minutes in the tin, then remove it to a wire rack to finish cooling.

When it’s cold, ‘feed’ it by making small holes in the top and bottom with a cocktail stick and spooning in a couple of tablespoons of Armagnac or brandy, then wrap it in parchment-lined foil and store in an airtight tin.

You can now ‘feed’ it at odd intervals until you need to ice or eat it.

Happy Christmas cake making!

Grouse with all the trimmings

The Glorious 12th of August marks the start of the grouse shooting season which runs until December.
I like the little birds and you’ll often find them on upmarket menus during the autumn months.
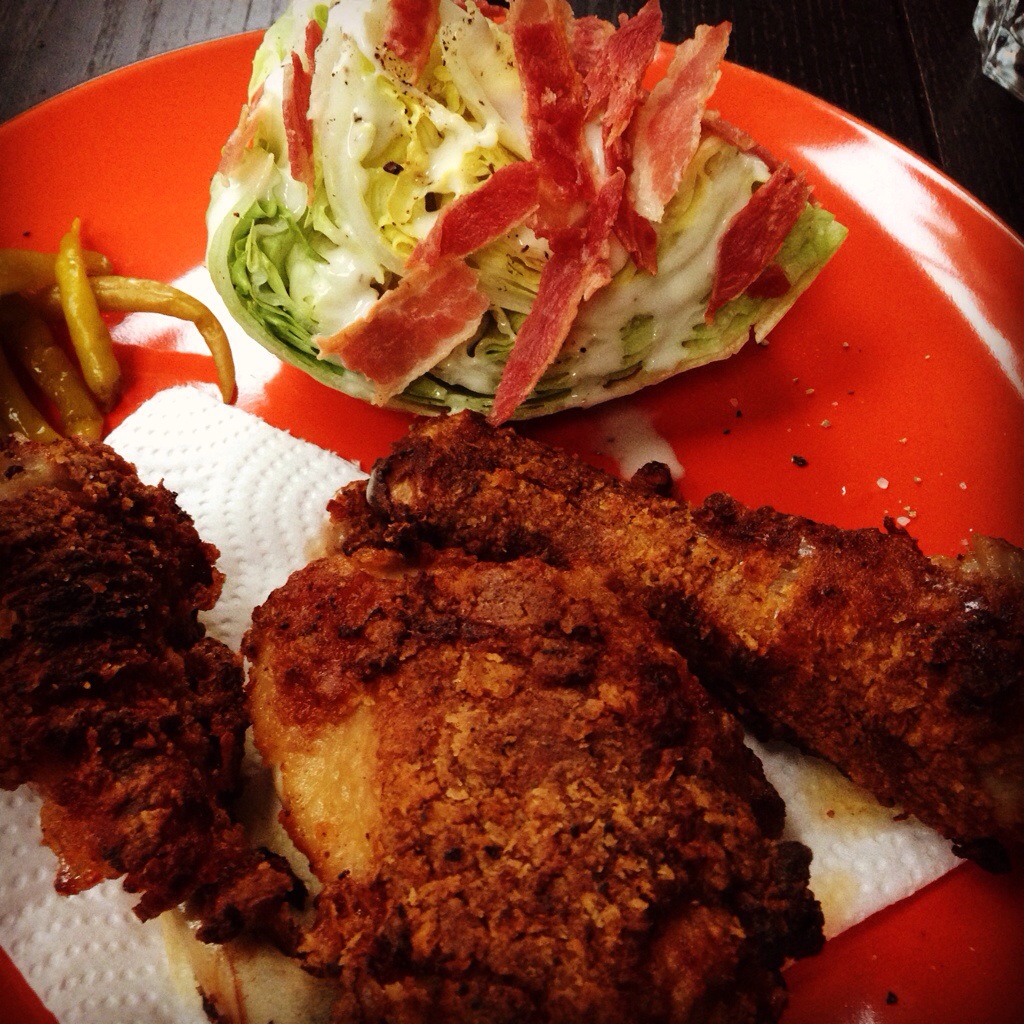
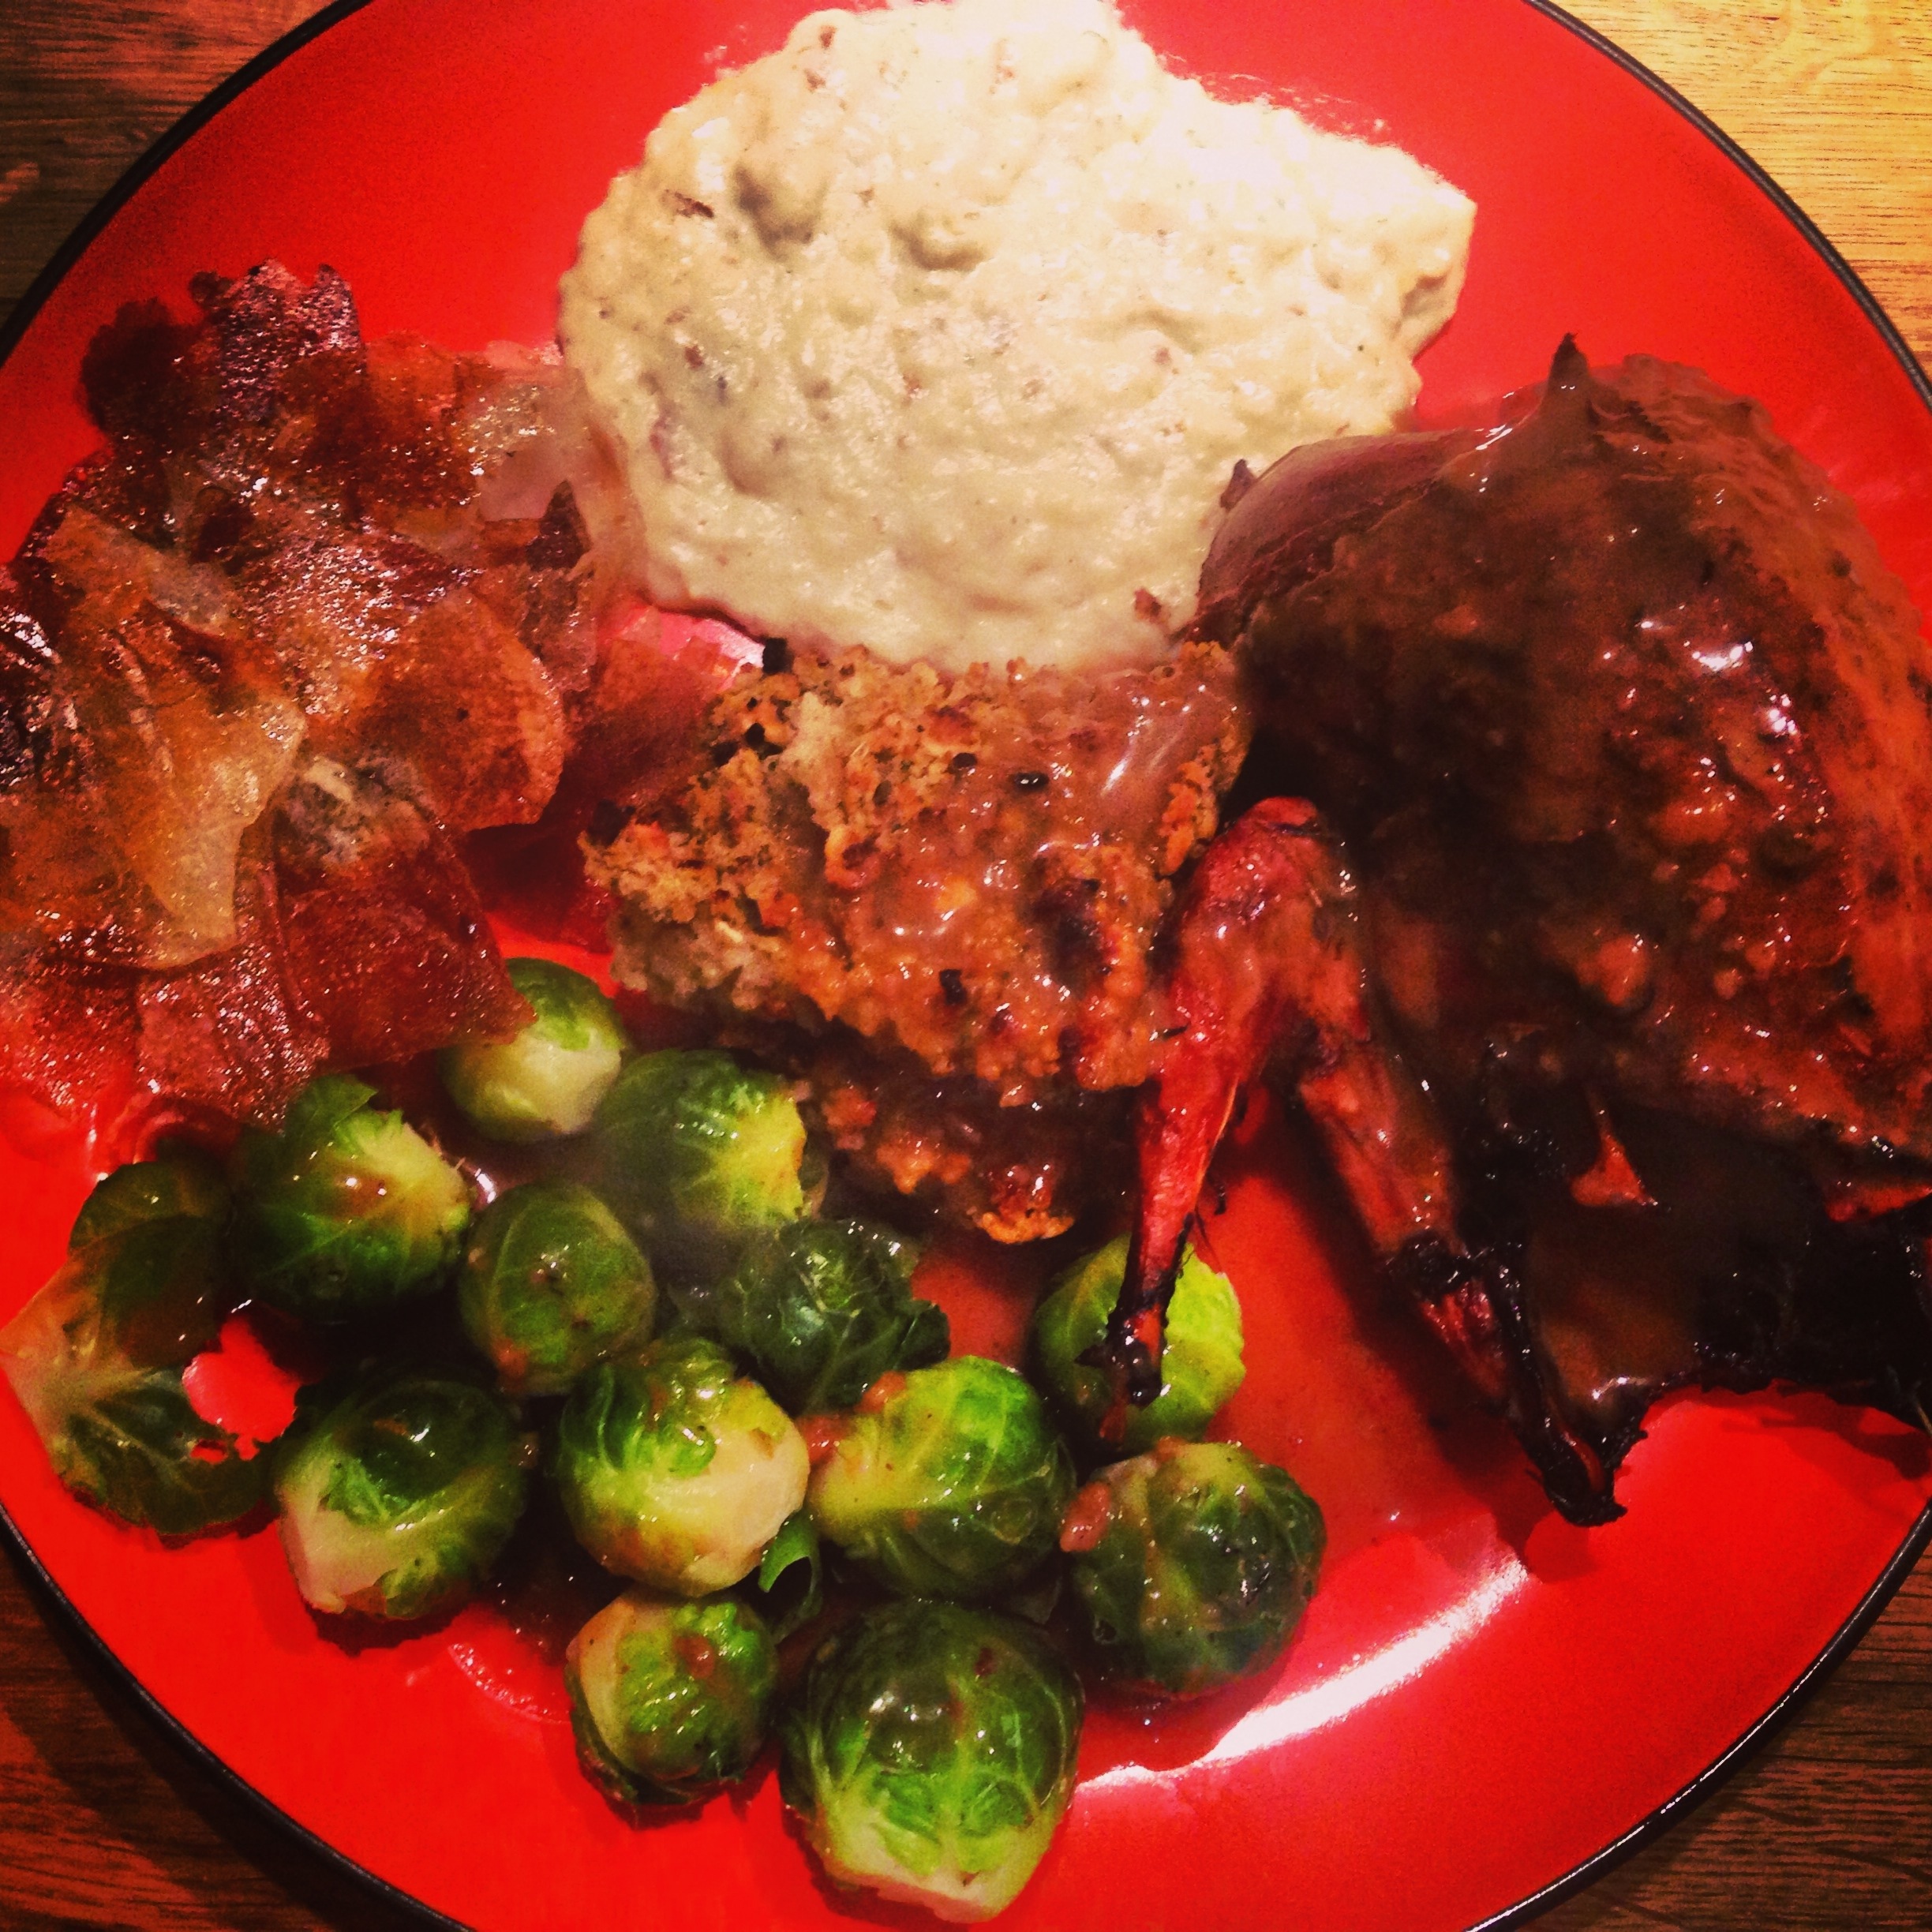
However what I really like is the trimmings, creamy bread sauce, crispy potato chips and fresh green brussel sprouts, all a nod that the best meal of the year (Christmas lunch) is not far away.
I’ve read that at the start of the grouse season some unscrupulous suppliers have been known to push out any remaining birds they had in their freezers.
For that reason now seems the perfect time to buy fresh as the season is in full swing and the shooters are supplying a steady stream of the feathered foodstuffs.
Down at Borough Market virtually every butcher seems to have grouse squeezed alongside pheasant and maybe a partridge or two.
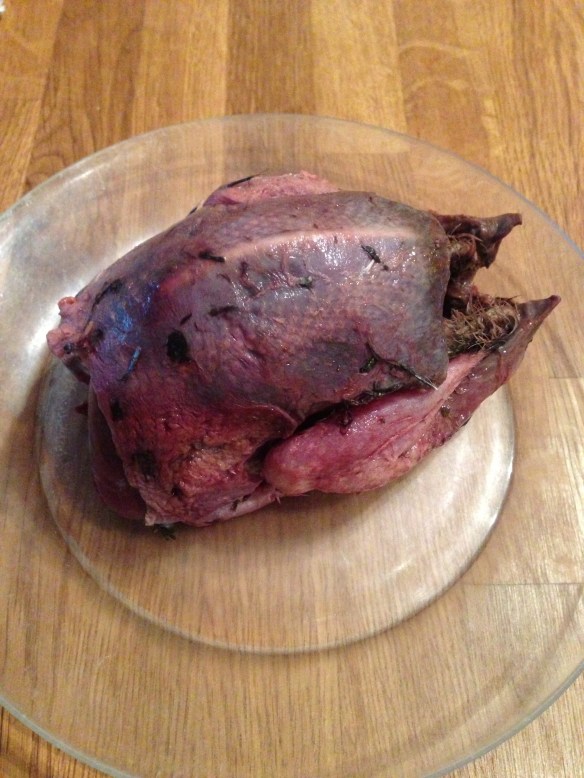
I got mine from my favourite poultry supplier Wyndham House at £9 each but I noticed the Ginger Pig was doing two for £14 – perhaps an indication of the number of birds on the market.
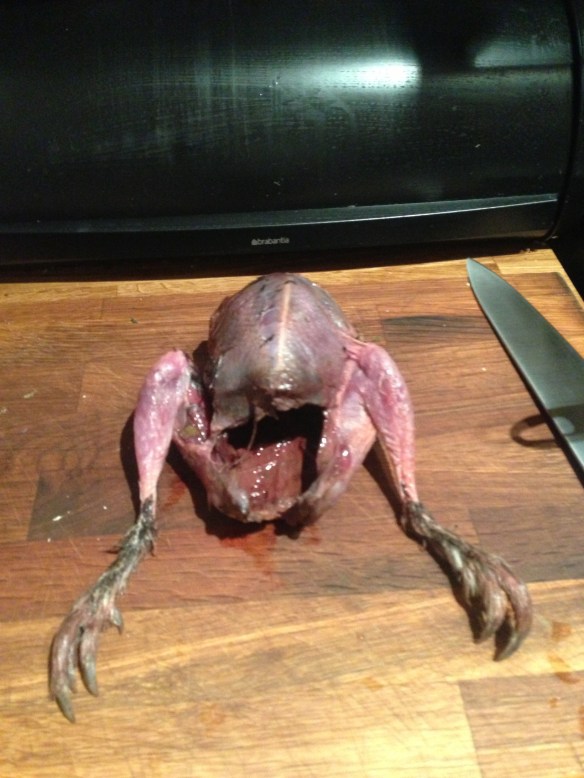
When I got home I roasted mine rubbed with butter, seasoned and draped in streaky bacon for about 20/25 mins in a very very hot oven.
Best served pink but you can cook them more thoroughly.
Admittedly small game birds can be tricky to eat but a sharp knife and a generous dollop of creamy bread sauce makes the experience one of the great culinary luxuries.

20131029-091510.jpg

20131029-091642.jpg

20131029-091719.jpg

20131029-092404.jpg

Roast grouse and bread sauce by Hugh Fearnley-Whittingstall

1/2-1 grouse per person, plucked and drawn, the neck and giblets reserved
a little soft butter, lard or dripping
2 rashers of fatty streaky bacon per bird
Salt and freshly ground black pepper

For the stock/dressing:

the neck and giblets from the bird (minus the liver)
the wings (optional)
1 small carrot, roughly chopped
1 small onion, roughly chopped
1 tbs fat or oil
1 bay leaf
red wine
plain flour
redcurrant or quince jelly (optional)
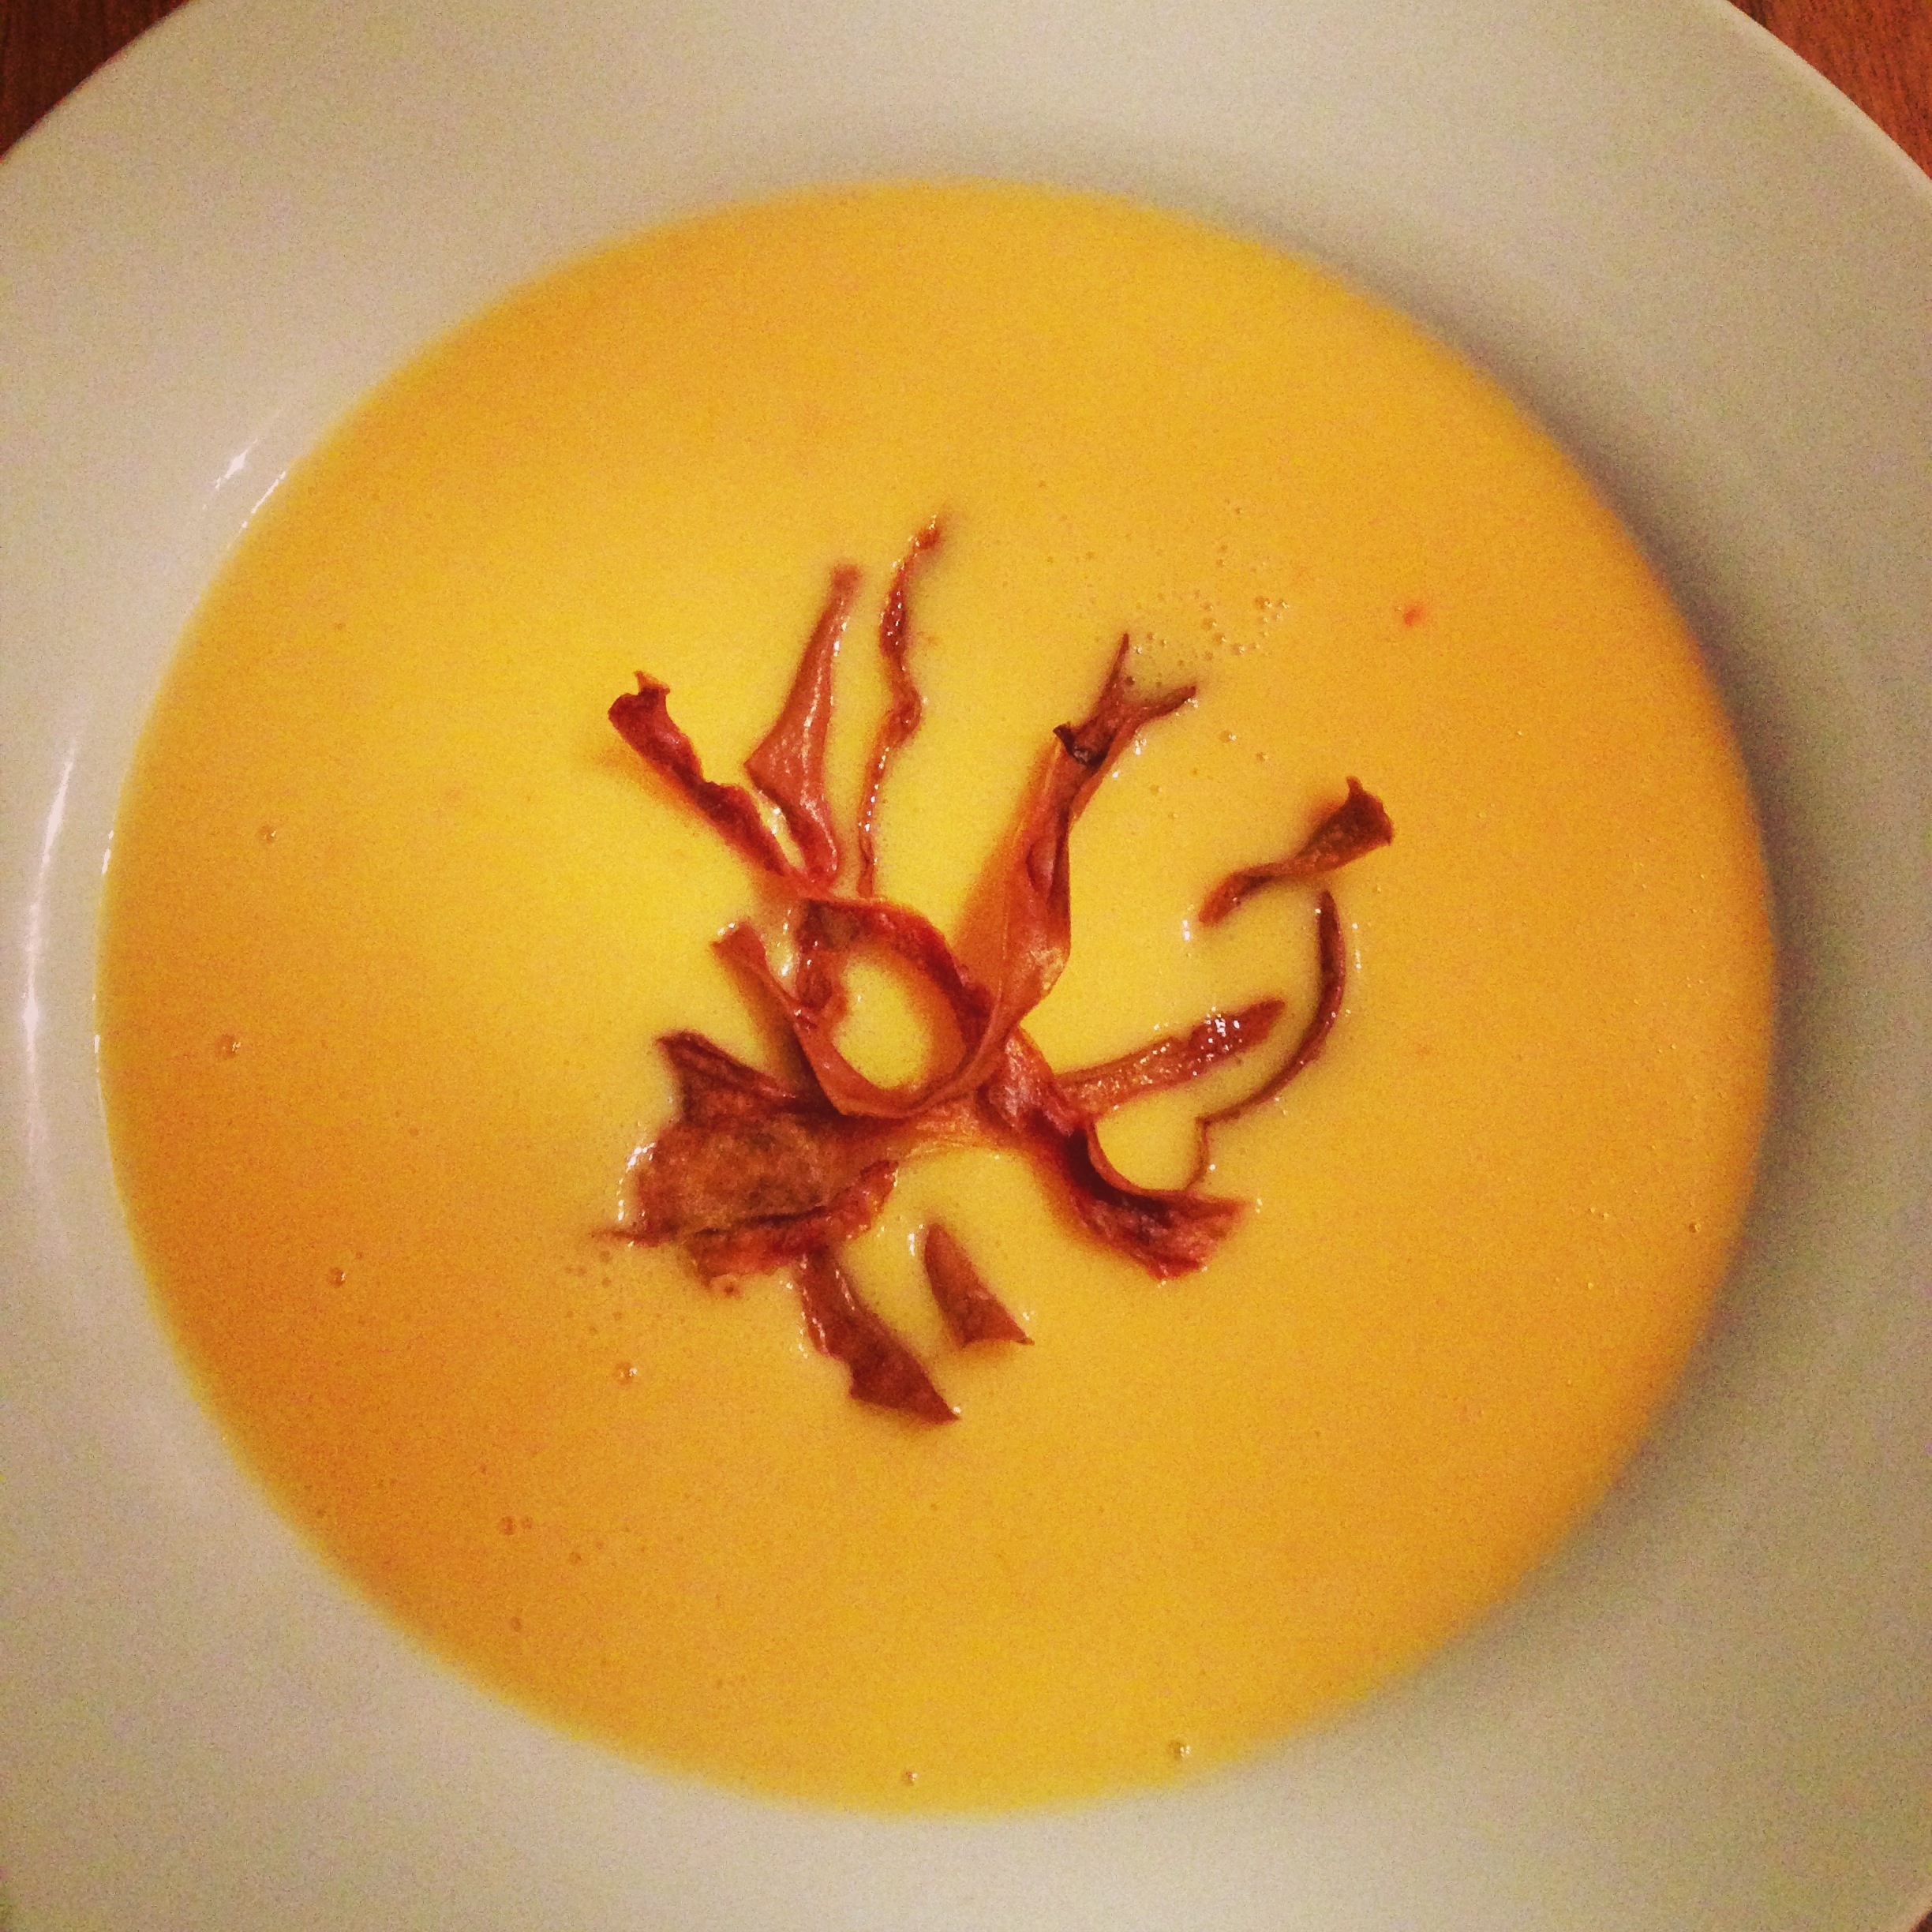
bread sauce

Prepare the birds by smearing a little fat over the breasts, seasoning with a twist of pepper and covering them with a couple of rashers of streaky bacon. The grouse’s liver is particularly good, and can be replaced in the cavity, perhaps with a couple of teaspoons of port, before cooking. Place in a roasting tin and put in the centre of a very hot oven (230C/gas 8).

Remove the bacon after 8-10 minutes and take it out of the oven if it’s as crisp as you’d like it to be. At this point you could baste the birds with any fat in the tin, but do it fast so as not to let the oven cool. About 20 minutes in total should be enough to cook most grouse through without drying them out, 25 minutes for a larger bird, provided in both cases they can rest for 10-15 minutes while you prepare the gravy. The meat should be just a little pink, but if this is not to your taste, add 5-7 minutes to the cooking time.

Skim off any excess fat from the roasting tin (what little there is will be from the bacon). Place the tin on the hob and sprinkle just a teaspoon of flour into it. Scrape the base with a wooden spatula, scratching up any crispy bits and mixing them with the flour and juices. Use a small splash of wine and a little of the reserved stock to help this process and loosen the gravy. Now strain all the liquid in the roasting tin through a sieve into a small clean saucepan. Whisk in the rest of the stock and bring to the boil. Taste the gravy, adding just a little redcurrant or quince jelly if you think it needs sweetness. Boil to reduce if you want to intensify the flavour, then season with salt and pepper as you see fit. Whisk in a little more flour if you want to thicken it. In short, fix the gravy how you like it.

Bread Sauce by Delia Smith (just halve quantities for less)

1. To make enough for eight people, halve a large onion and stick cloves into each half (how many you use is a matter of personal taste – I suggest 15-18. If you don’t like them at all, use some freshly grated nutmeg instead). Place the onion halves in a saucepan with a bay leaf, 8 black peppercorns, 1 pint (570 ml) of creamy milk and some salt. Bring everything up to simmering point, remove from the heat, put the lid on and leave everything to infuse for at least 2 hours.

2. When you are ready to make the bread sauce, remove the onion, bay leaf and, if you can, the peppercorns, with a draining spoon. Keep the onion to one side, as you may want to put it back into the finished sauce for extra flavour.

3. Stir 4 oz (110 g) freshly made white breadcrumbs into the milk and add 1 oz (25 g) butter. Stir over a low heat to melt the butter and thicken the sauce slightly – this will take about 15 minutes.

4. After that, you can add the onion back in, to give the sauce extra flavour. Leave the sauce in the pan in a warm place until you are ready to serve it. Just before serving, remove the onion and spices. Re-heat the sauce gently then beat in another 1 oz (25 g) of butter and 2 tablespoons of double cream. Taste to check the seasoning. Pour into a warmed serving jug.

Game chips

1) Using a manolin on medium setting slice one medium potato per person
2) Brush each piece with olive oil and place on baking tray
3) Roast in 200c oven for about 10 minutes until crisp.
4) Drain on kitchen paper and repeat until you have enough, season and serve.

BBQ ribs but in the oven

I have been watching the Kevin Spacey series House of Cards.
In the show Congressman Frank Underwood despite his wealth and power loves nothing more than take away ribs from a back street BBQ joint.
It got my taste buds going and when a friend recently went to Texas I asked her to get me some BBQ sauce. I ended up with Ray Benson’s Asleep at the Wheel BBQ sauce and decided to have bash at recreating some typical US style ribs soaked in smokey sweet sauce.
After getting some baby back ribs from my butcher Nathan Mills the Butchery in Bermondsey I did some research and got cooking.
They were delicious, especially with some homemade coleslaw

20131020-210918.jpg

Ingredients (serves one)

Two half racks of baby back ribs
BBQ sauce of your choice (make your own if you like)

Method

1) Coat ribs with BBQ sauce and leave to marinade in casserole dish for at least four hours or overnight in the fridge.
2) Preheat oven to 150c and cover ribs with foil and cook on middle shelf for two and a half hours, turning and basting several times.
3) Turn off oven and pre-heat grill or griddle pan.
4) Add ribs and after brushing with residual sauce caramelise until crisp and almost burnt.
Serve with plenty of napkins. This is delicious with a cold beer or two.

20131020-212019.jpg

20131020-212244.jpg

Spaghetti vongole

Shellfish are one of my favourite ways to eat fresh seafood. Clams, mussels, cockles and oysters seem to hold mouthfuls of the delicious ozone you get from being near a crashing wave and release them only under pressure of heat or the shuckers knife.
It is worth tracking down a good seafood supplier and taking the time to prepare the shellfish yourself – i dread to think how the supermarkets do it on an industrial scale.
Be aware this recipe involves soaking the clams for at least two hours so maybe put them in the fridge to soak before you leave for work.
This dish marries my love of Italian food with the simple tiny clam which seems to inhabit a shell far to large for itself.
There are very few ingredients in the dish which is usually a sign of a classic and this recipe is adapted from one by my friend Felicity Cloake whose wonderful work perfecting the “perfect” example of so many recipes has helped me on many a culinary task.
You can buy her book from Amazon. Perfect: 68 Essential Recipes for Every Cook’s Repertoire

20131018-091655.jpg

Ingredients – for one serving

Three handfuls of small clams
100g spaghetti (dried)
Two knobs of butter
Splash of good extra virgin olive oil
One clove of garlic, finely chopped
1/4 medium-hot red chilli, finely chopped
Half a glass of dry white wine
tbsp of flat-leaf parsley, roughly chopped
Two grates of lemon zest and a spritz of juice

Method

1. Rinse the clams in cold running water, and scrub if necessary, then put them into a large bowl and cover with cold water. Salt generously and leave for a couple of hours, then drain and rinse well to remove any grit or sand.

2. Put the spaghetti into a large pan of salted boiling water and cook for a couple of minutes under the recommended time, until nearly done.

3. Meanwhile, put a knob of butter and the olive oil in a large pan over a medium heat and soften the garlic and chilli.

4. Add the drained clams, and turn up the heat. Pour in the wine, cover and leave for a couple of minutes until most of them have opened. Discard any that are still closed. Add the others to the sauce, picking a few out of their shells for variety.

5. Drain the spaghetti and add to the pan along with the remaining knob of butter. Toss well and leave for a minute, then stir through the chopped parsley, lemon zest and juice, season to taste and serve.

Beetroot and chocolate brownies

I’m in a race against time to eat all the root vegetables on my allotment before the first frosts turn lovely earthy beetroots to slush.
So like the courgettes before I am trying recipes of every kind – soups, roasted, dips and, err, cake.
I first tasted this combination at the River Cottage Canteen in Axeminster and it was great.
It might sound funny but I guess it’s no different to the principles of carrot cake whereby the vegetable adds moisture and bite.
It doesn’t matter what kind of beets you use, I put in a mixture of boltardy and golden but I guess the really red ones make the cakes even darker?
Tip, use a pair of washing up gloves to stop staining your fingers when grating the cooked and cooled beets.
I’ve cooked a beetroot and chocolate fondant pudding recently but this is more of a crowd pleaser.
Thanks to the River Cottage website for this recipe.

20131016-224130.jpg

Ingredients (makes around 20)

250g unsalted butter, cut into cubes
250g dark chocolate (about 70% cocoa solids), broken into pieces
3 medium eggs
250g caster sugar
A pinch of sea salt
150g self-raising flour (wholemeal ideally but white works well too)
250g beetroot, boiled until tender, cooled, peeled and grated

Method

1) Grease a shallow baking tin, approximately 20 x 25cm, and line the base with baking parchment.
2) Put the butter and chocolate in a heatproof bowl and melt them together in the traditional way, over a pan of hot water.
3) Whisk the eggs and sugar together in a large bowl until combined then beat in the melted chocolate and butter until smooth. 4) Combine the salt with the flour, sift them over the chocolate mixture, then gently fold in with a large metal spoon. Fold in the grated beetroot – be careful not to over-mix or it will make the brownies tough.
5) Pour the mixture into the prepared tin and smooth the top with a spatula.
6) Bake for 20 – 25 minutes; when the brownies are done, a knife or skewer inserted in the centre should come out with a few moist crumbs clinging to it. Don’t be tempted to overcook them or they will be dry.
7) Remove the tin from the oven and leave on a wire rack to cool before cutting in to squares.

Spaghetti with courgettes

This is probably one of my favourite lightning quick week night dinners during the summer when my allotment is throwing out courgettes like missiles.

It’s simple to make and contains chilli, garlic and salt – ingredients which go really well together – in fact the garlic I’ve used in the picture was also home grown.

The other lovely aspect of this dish is you can fiddle with the ratios depending on your taste and make enough for a a family or simply a meal for one.

Image

 Recipe – serves one

Ingredients

Two average-sized courgettes (any variety and the fresher the better but you can also use big ones just cook down for longer)

Half a red chilli, finely chopped 

Half a garlic clove, finely chopped 

Pinch of salt and grinds of pepper

100g of pasta (I prefer spaghetti)

Splash of olive oil


Method

1) Boil a saucepan of water and cook pasta as pack instructions.

2) Using a box grater grate the courgettes on the medium blades.

3) Heat oil in frying pan over medium heat and add chilli and garlic.

4) Add courgettes, stir and add a pinch of salt and couple of grinds of black pepper.

5) Stir occasionally while pasta cooks but do not let courgettes brown, you are trying to draw some of the moisture out of the vegetables not brown them.

6) Drain pasta and add to the courgettes, stir, transfer to a plate or bowl and grate over some Parmigiano-Reggiano if you have some.

#yummers

Shepherd’s Pie with cheese champ topping

When the nights close in and the leaves start falling from the trees my mind turns to hearty oven cooked favourites like shepherd’s pie.
Here’s a belting one from Gordon Ramsay’s new book Ultimate Home Cooking.
He says it’s his “all-time favourite family recipe” and it’s certainly tasty and very easy to make.
I “pimped” mine by adding a chopped red chilli at the same time as the garlic and it gave it some underlying heat.
It’s just as tasty a day later reheated and served with buttered carrots or, as in this case, some cavolo nero from the allotment dressed in Di Simone olive oil and chopped anchovies.

Ingredients

olive oil, for frying

1kg minced lamb

2 garlic cloves, peeled and finely chopped

1 red chilli, finely chopped

1 onion, peeled and diced

2 leeks, trimmed, halved lengthways andfinely sliced

1–2 tbsp Worcestershire sauce

1 tbsp tomato purée

100ml  red wine

250ml chicken stock

2 rosemary sprigs, leaves only, chopped

sea salt and freshly ground black pepper

FOR THE TOPPING

750g-900g potatoes, eg Maris Piper, peeled and cut into chunks

50g butter

3 spring onions, trimmed and finely chopped

100g  Cheddar cheese, grated

50ml–100ml milk, optional

1) Preheat the oven to 180C. Place a large, wide frying pan or hob-proof casserole dish over a medium-high heat. Add a dash of oil and fry the mince in batches, seasoning each lot, until well browned. Add the garlic for the last 2 minutes. Transfer to a plate.

2) Put a little more oil in the same pan and cook the onion and leeks over a medium heat for 5–7 minutes, until completely softened. Add Worcestershire sauce to taste, then stir in the tomato purée.

3) Return the mince to the pan and stir well. Pour in the wine, scraping up any bits from the bottom. Bubble for a couple of minutes to burn off the alcohol, then add the stock and bring to the boil. Reduce to a simmer, then add the rosemary and adjust the seasoning as necessary. Cook gently for 10–15 minutes, until the sauce has reduced slightly and the flavours are well combined. Set aside to cool.

4) Meanwhile, prepare the topping. Boil the potatoes until tender, then drain and mash until smooth. Mix in the butter and seasoning, then add the spring onions and three-quarters of the cheese and mix again. Taste and adjust the seasoning as necessary. If the mash is too dry add a splash of milk to loosen.

5) Put the lamb mixture into a 28cm x 22cm (11in x 81⁄2 in) baking dish and top with the mashed potato. Sprinkle with the remaining cheese and a little salt and pepper. Bake for 15–25 minutes or until the potato is golden brown and the meat is bubbling underneath, and serve.

Taken from Gordon Ramsay’s Ultimate Home Cooking

20131014-211438.jpg